
How do I create and use a Theme?
Themes and Styles enable you to fine tune the look and feel of your dashboards. In this article, we'll explain how to create and use Themes. If you're looking for a high level overview of Themes, be sure to check out the Introduction to Themes and Styles article.
How to Manage Themes
There are several places within SharpTools.io that you can view and manage your Themes.
- Dashboard Settings > Theme Dropdown
- Dashboard List > Overflow Menu
- Manage Resources > Themes Tab
Dashboard Settings - Theme Dropdown
One of the first places most people will encounter Themes is within the Dashboards Settings screen for a particular dashboard. When viewing a dashboard, you can tap the `...` button in the bottom-right corner of the dashboard and tap Configuration to bring up the Dashboard Settings screen.
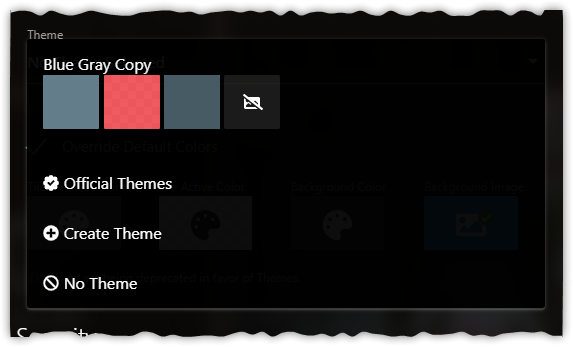
On the Dashboard Settings screen, you'll find a Theme dropdown which enables you to:
- Select a User Theme
- Select an Official Theme
- Create a Theme (Quick Create)
After selecting a theme, additional options will appear below the dropdown:
- Edit Theme
- Copy Theme
Official Themes
If you're just getting started with Themes, you may want to try out some of the Official Themes which are Themes published by the SharpTools staff. Using an Official Theme enables you to quickly get a feel for what kind of visual changes can be applied with Themes.
After you've selected an Official Theme from the dropdown, you can save your Dashboard Settings to see the theme take effect. If you like a Theme, but want to customize certain aspects of it, you can tap the 'Edit Theme' or 'Copy Theme' link below the Theme dropdown selector in Dashboard Settings. Tapping one of these options will make a copy of the Official Theme and open it up for editing.
Create a Theme (Quick Create)
As an alternative to Official Themes, you may wish to create your own theme from scratch. To do this, select the 'Create Theme' option from the Theme dropdown in Dashboard Settings.
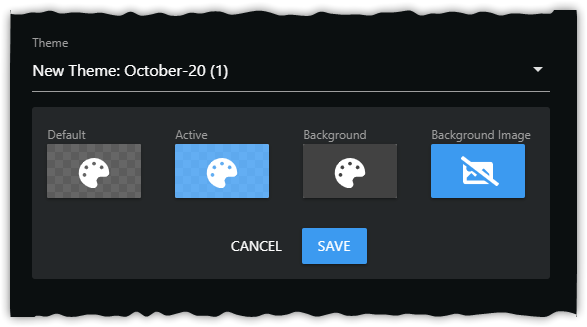
Once you've selected the 'Create Theme' option, a 'quick create' editor will be displayed allowing you to edit the most commonly used features of Themes including the Default/Active color, Background Color, and (optionally) Background Image.
Once you've tapped Save, the Theme will be saved to your account and selected in the Theme dropdown. From here, you can Save the Dashboard Settings to immediately see the Theme take effect.
Note that when the 'quick create' feature is used, the theme is automatically saved using the Month-Year format, but you can edit the Theme Name and other settings from within the full Theme Editor. To access the full Theme Editor, tap the 'Edit Theme' link that shows up below the Theme dropdown after the 'quick create' Theme is saved.
Select a User Theme
Once you've created your own Theme or copied and customized one of the Official Themes, you'll see your themes in the drop-down list along with an approximation of the key colors in the Theme color scheme.
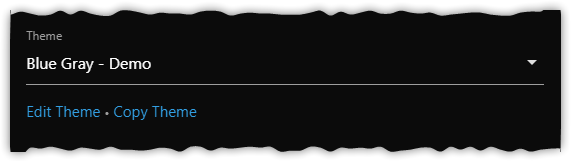
Once you've selected a Theme, you can tap the 'Edit Theme' link just below the Theme dropdown selector to access the full set of Theme options including additional color settings, corner rounding, borders, animations, and more.
You can right click the 'Edit Theme' link and open it in a new window. This is helpful if you want to have the Theme Editor open on one screen and your dashboard open in another so you can edit the theme and watch the changes take effect.
Dashboard List - Overflow Menu
In addition to accessing the list of themes from the Dashboard Settings, you can also manage your themes from the Dashboard List. While on the dashboard list, you can tap the `...` button in the top-right corner of the page and select Manage Themes. You'll be presented with a list of User Themes that are saved to your account and a button to Create Theme.
Tapping the Create Theme button will prompt you to decide if you want to create a New Theme (from scratch) or if you'd like to Copy an Official Theme to use as a baseline in creating your new theme. If you select the 'Copy Official Theme' option, you'll be presented with a list of Official Themes that you can copy from.
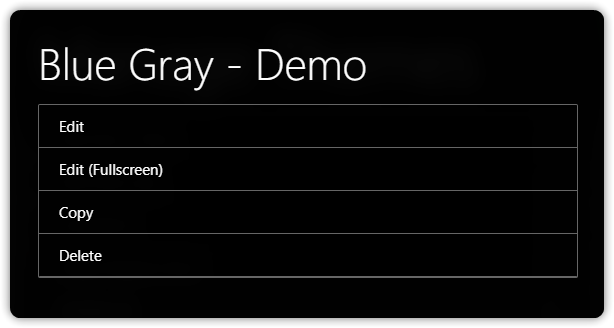
If you already have User Themes created, you can either tap on a Theme name directly to open the Theme Editor or you can tap the `...` button to the right of the Theme name to bring up a menu with additional options:
Manage Resources - Themes
As an alternative to the above options, you can also manage your Themes directly from the Manage Resources screen where you'll find a 'Themes' tab. The Themes tab of the Manage Resources screen is equivalent to the Manage Themes screen shown in the Dashboard List - Manage Themes, so refer to the above section for more details on the available options.
Theme Editor
Now that you're familiar with the various methods of accessing Themes, let's dive into the Theme Editor. As mentioned in the Introduction to Themes article, Themes enable you to fine tune the look and feel of your dashboard through a number of top-level dashboard settings as well as a collection of Styles.
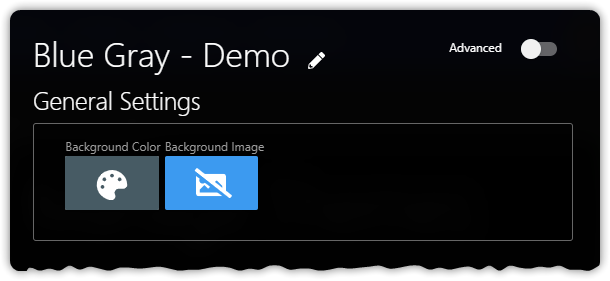
General Settings
At the top of the Theme Editor, your Theme Name is displayed. You can tap the pencil icon next to the name in order to edit it. Below that, you'll find the General Settings section which includes options for customizing your Dashboard Background Color and optionally the Dashboard Background Image.
Below that, you'll find a list of Tile Styles. As you might surmise from the name, these styles apply to the tiles on your dashboard and enabled you to adjust the look and feel of your tiles.
Tile Styles
Each Theme comes with a 'Default' and 'Active' style. The 'Default' style applies to all tiles by default - any unique style features that are applied through the 'Add Customization' option will cascade down to other styles unless those features are explicitly customized in other styles. For example, you can apply a Tile Radius (Corner Rounding) or Border to your 'Default' style and it will automatically be applied to all other styles unless you customize the same feature in your other styles.
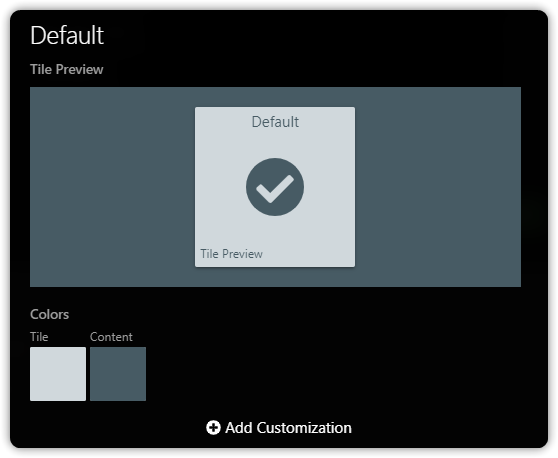
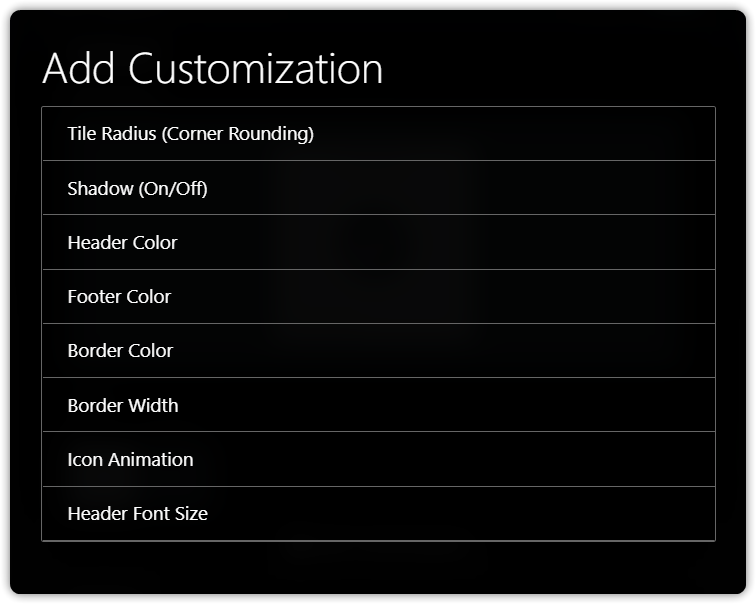
While editing a Style, you'll automatically see a preview of your customizations. You can also toggle the 'Preview' off at the top-right corner of the Tile Styles list. You can tap the 'Add Customization' option at the bottom of any Style to add or remove customizations from a tile.
Add Style
At the bottom of the Tile Styles list, you'll find a button labeled 'Add Style'. This enables you to add your own named styles to the Theme. Unlike the 'Default' and 'Active' style, named styles are not automatically applied to tiles, but while you are editing your Dashboard you can open the Tile Editor for any Tile and customize which named style is used.
For more details on how to use named styles, check out the How do I use a named Style from a Theme? article.
Try using consistent style names across your themes. For example, you might create a 'Warning' and 'Alert' style in each of your Themes. After you've applied these named styles to your tiles, you can easily switch between Themes that have styles with those names and quickly see the visual changes take effect.
You can also customize the style of individual tiles tiles directly without creating a named style. This is particularly helpful for one-of-a-kind styles that you don't plan on reusing across multiple tiles. Check out the How do I customize a style for an individual tile? article for more details.
Custom CSS
Hidden behind the 'Advanced' toggle (which is found in the top-right corner of the Theme Editor), you'll find the Custom CSS option which shows up at the bottom of the Theme Editor. This is a free-form text field that enables you to enter any CSS you'd like. This feature is intended for power users with some degree of knowledge of Cascading Style Sheets.
Take caution in choosing what styles you apply in your Custom CSS. If you end up applying Custom CSS that causes an issue on your dashboard, you can always edit the Theme from either the Dashboard List or Manage Resources.
Other Thoughts
Themes and Styles are a wonderful tool for customizing the look and feel of your dashboards. Be sure to check out the following resources for more information and post in SharpTools Community if you have more questions or are interested in seeing what other users have done with Themes.