
How to trigger SharpTools rules using HTTP
HTTP Triggers enable a rule to be triggered by a standard web request sent from a third party application or service, such as IFTTT, Zapier, Microsoft Power Automate (Flow), Tasker, or any other applications/services that can send an HTTP request.
Rule HTTP Triggers are a Premium only feature, and can be accessed during your Premium trial period. If you are using the free tier, please send an email to support@sharptools.io if you'd like us to reset your trial so you can give HTTP Triggers a try.
What can I do with an HTTP Trigger?
Being able to trigger a SharpTools rule from an HTTP request enables a wide range of integration possibilities allowing other services/platforms to control devices, send notifications or update SharpTools variables through Rule Engine. Immediately following is a list of just some of the many popular services/platforms that can make HTTP requests and thus integrate with SharpTools using the HTTP Trigger feature:
- IFTTT
Smart devices not natively supported in SmartThings/Hubitat or general helpful services (calendars, business tools, storage, health management, etc) can trigger rules in SharpTools to update the virtual/physical devices' states and more based on the desired condition(s). - WebCoRE
Some of our users are existing WebCoRE users, and this allows them to keep their highly complex rules, such as averaging device values, in WebCoRE but send the data to SharpTools directly for dashboard display or for use in other automations with SharpTools rules. - Hubitat Rule Machine
Hubitat users can share their Hubitat Global Variables to SharpTools Variables without having to create Virtual Devices as a proxy for syncing data to SharpTools. Rule Machine users can now directly send HTTP requests to SharpTools to set variables or trigger other automations. - Shortcuts (iOS)
Shortcuts is an app that is built into modern iOS devices. Users can create a widget in iOS which directly runs a SharpTools rule (via the HTTP Trigger), and execute a series of actions (or even conditional actions) in a SharpTools rule. - Tasker (Android)
Tasker is a popular tool that enables automation and workflow on Android devices, and can push an HTTP request with the desired data to trigger a SharpTools rule which can interact with other smart devices you have in SharpTools. - Blue Iris / TinyCam
These are both popular IP Camera monitoring solutions which can trigger SharpTools rules to send notifications, turn lights on or take other advanced conditional actions by sending an HTTP request (webhook) to trigger a rule when motion or alerts are detected. - Home Assistant / HomeSeer
Home Assistant and HomeSeer users can push data through HTTP Trigger to trigger a rule and set SharpTools variables for dashboard display or to take conditional actions in SharpTools.
Looking for more creativity and inspiration? You can also find more use cases shared by our community users here.
How to use HTTP Trigger
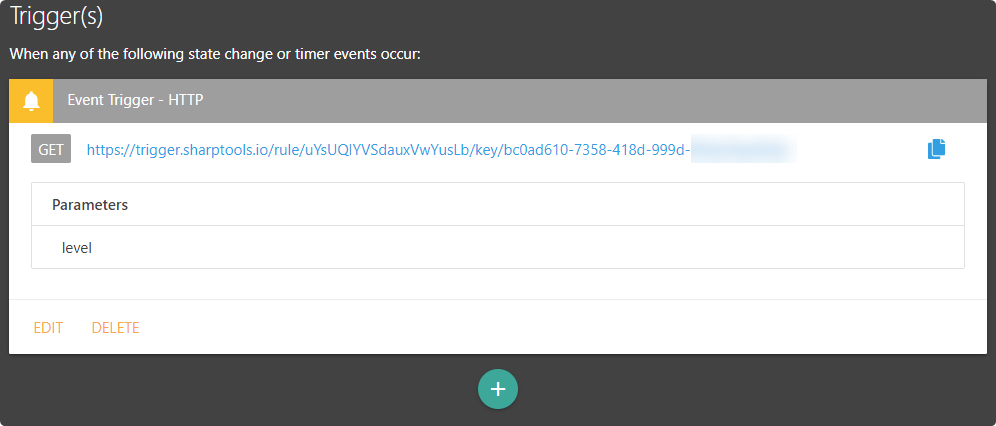
Like other SharpTools rule triggers, an HTTP Trigger can be added to a rule in the Trigger section. Once added, the HTTP Trigger displays a special URL which can be used from other services or applications capable of sending an HTTP request.
Add HTTP Trigger in rule
- Tap the
 button in the Trigger(s) section and add an Event Trigger
 - Select HTTP
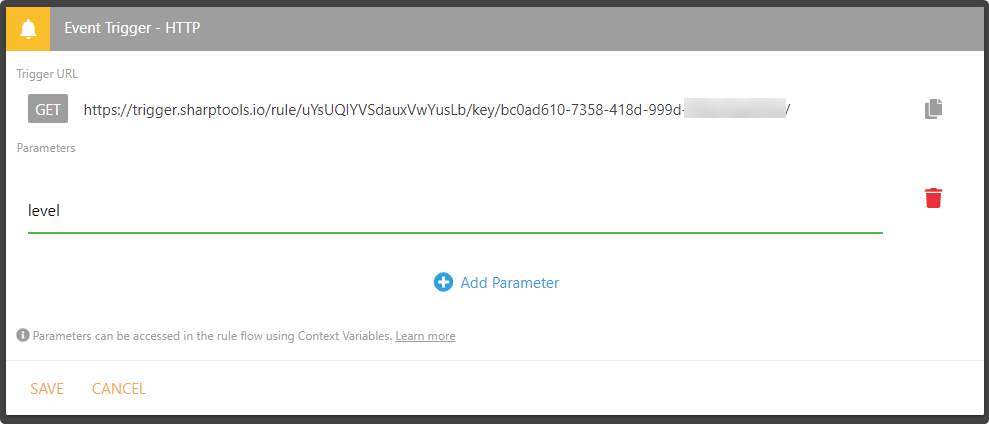
- Optionally, add expected request parameters (see 'How to use Request Parameters' below)
- Tap the Save button at the bottom of the card
- Copy the generated Trigger URL, which should be used in the third party service/application where to initiate the HTTP request.
 button in the Trigger(s) section and add an Event Trigger
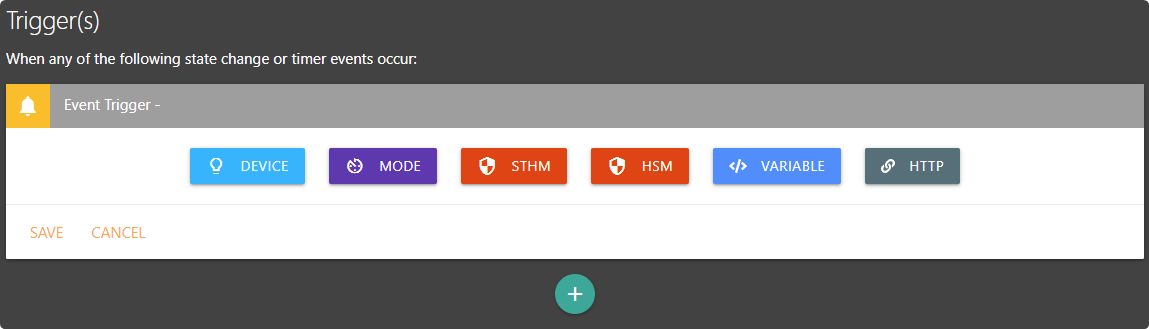
Please keep the HTTP Trigger URL private! Do not post the rule's HTTP trigger URL publicly or share with anyone you don't trust as the trigger URL contains a special key that is authorized to execute the associated rule.
Send an HTTP request to trigger the rule
The HTTP Trigger accepts both GET and POST methods. How to initiate an HTTP request varies in each different service/application, but there are several things that are generally needed in order to make the request:
- Method: GET or POST
- URL: the HTTP Trigger URL generated from the step above
- Parameters / Body (optional)
- Data can be passed to a SharpTools rule using either query parameters (GET / POST) or as a JSON payload (POST)
- See the section 'How to use Request Parameters' below for more details.
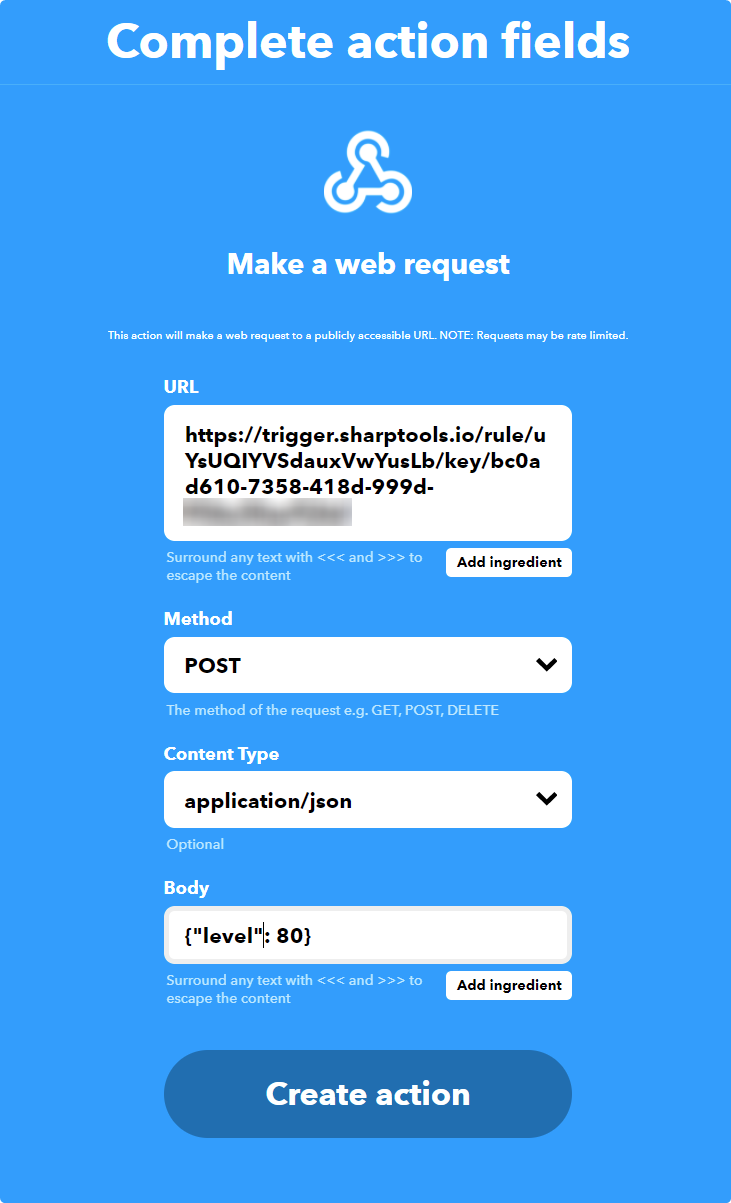
Here is an example of sending a web request in IFTTT by selecting Webhooks as the action in IFTTT's applet.
How to pass data to a rule? (Request Parameters)
Data can be included in the HTTP request as query parameters or as a JSON payload to be passed to the SharpTools rule. These parameters can then be accessed in the rule flow in device commands, notifications, and variables by using Context Variables.
Query Parameter Example:
https://trigger.sharptools.io/rule/(rule_id)/key/(auth_key)/?level=80
POST Body Example:
{
    "temperature": {
        "value": 85
    }
}
Basic parameters that are passed as query parameters or as top level keys in a JSON payload can be accessed using either 'Predefined Parameters' or 'Custom Parameters' as described further below. If a JSON object is passed and includes nested properties, you must use the 'Custom Parameters' option along with standard 'object.property' notation to access the nested properties.
You can mix Query Parameters along with a JSON Payload, but if there are any overlapping keys the data in the JSON payload takes precedence.
Predefined Parameters
When editing the HTTP trigger in the rule editor, you can define parameters that you expect to receive as part of the HTTP request. Once these are defined, they can be selected from the Select Variable prompt in various rule actions. See the example below in which a 'level'parameter is defined as part of the HTTP Trigger and can be selected under the HTTP Event section in the Context Variables list in the notification content.

Custom Parameters
As an alternative approach to defining expected parameters in the HTTP Trigger, you can also select the Custom Parameter option in the HTTP Event section from the Select Variable Prompt and input a desired parameter name to access a parameter that you expect to be included in an HTTP request.
The Custom Parameter option also supports nested properties of JSON objects using the standard
object.property notation. e.g. the value property in the POST Body example above can be access by inputting temperature.value in the Custom Parameter prompt
